web-to-case and web-to-lead tutorial
As anticipated in our previous blog article, we are now taking a deep dive to see how the Web-to-Case and Web-to-Lead actually work. You will see they're both straightforward to setup and they bring immense advantages to your team's work.
Web-to-case tutorial
Prerequisites
First of all, it pays off to creeate an email tmeplate that will fire to your clients once they submit the case - it's your chance to make it as detailed as possible. It's good practice to remind them of your business hours (or SLA agreement if they have one) and first response time with this email, and any other information that's relevant to them.
Once that's done and dusted, you can create a Queue for assigning cases directly to the users. Keep in mind that default owners from the Support Setting will be assigned to all submissions if you don't create your own.
Setup
in Setup, use the Quick Find box to find the Web-to-Case and click on it
Tick the Enable Web to Case box
Choose a Case of Origin from the dropdown menu - email, phone, or web
Select the default Response Template you've created during the Prerequisites phase
Provide an Email Signature or just use the default one
Save
Generate HTML
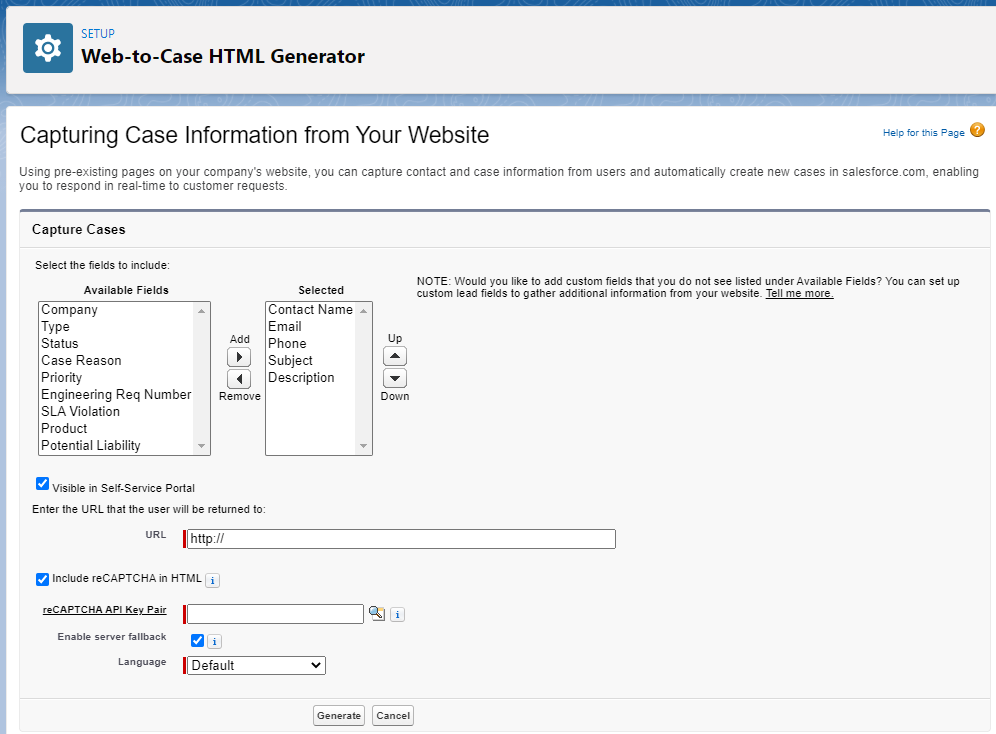
Use the Quick Find box to find the Web-to-Case HTML Generator and click on it
Select fields you want to show in your form from the Available Fields section and add them to the Selected section
Enter the Return URL - best practice is to create a different webpage than the homepage so users have visual confirmation they submitted their form correctly
Click on the Generate button
Once you've completed these steps, Salesforce will generate HTML code for you to copy/paste in the page of your website where you want this form to appear. Click on the Finish Button once you have saved the code somewhere safe.
And voilà.
Web-to-lead tutorial
Setup
in Setup, use the Quick Find box to find the Web-to-Lead and click on it
Tick the Web-to-Lead Enabled box
Generate HTML
Click on Create Web-to-Lead Form button
Select fields you want to show in your form from the Available Fields section and add them to the Selected section
Enter the Return URL - best practice is to create a different webpage than the homepage so users have visual confirmation they submitted their form correctly
Click on the Generate button
Once you've completed these steps, Salesforce will generate HTML code for you to copy/paste in the page of your website where you want this form to appear. Click on the Finish Button once you have saved the code somewhere safe.


